
Bondrucker drucken Belege, Küchendrucker drucken Bestellungen für Küche und Theke. Du richtest sie im Dashboard ein, die Kassen-App übernimmt die Einstellungen automatisch.
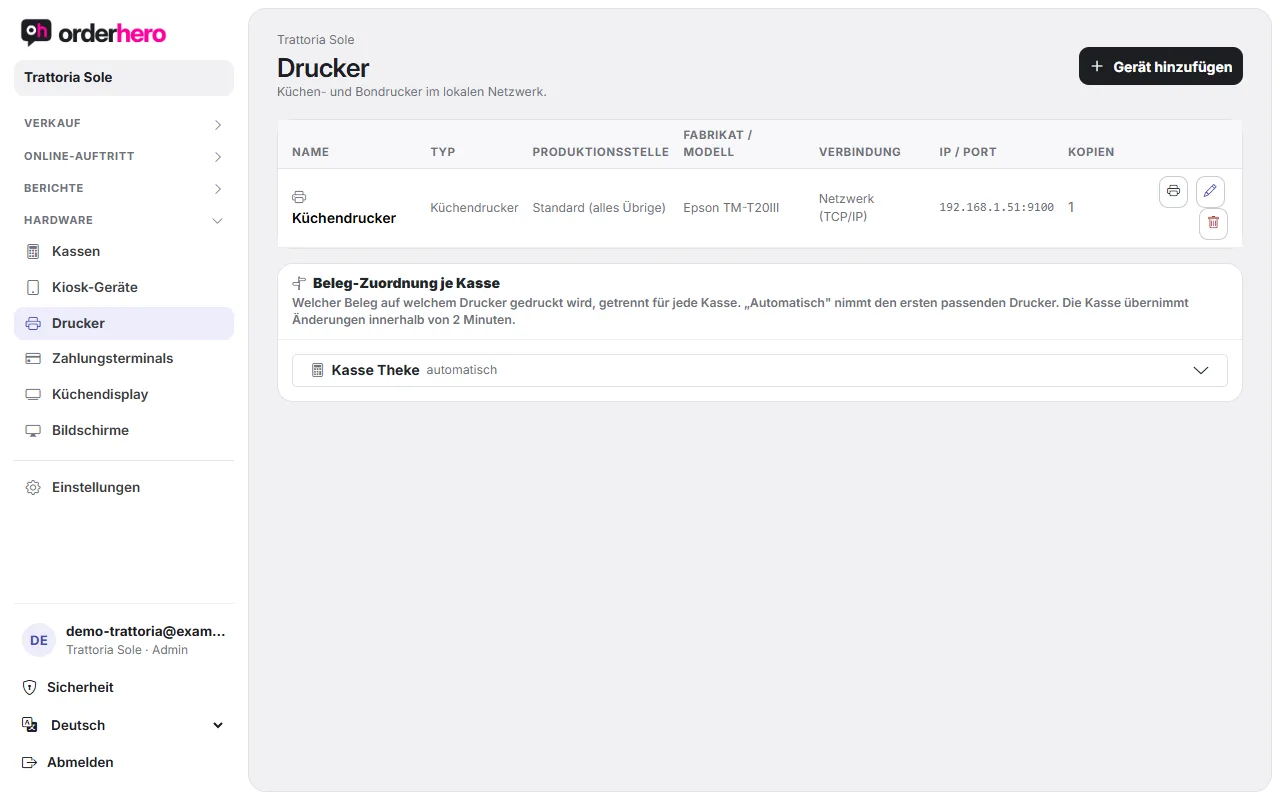
Add printer
- Öffne Hardware → Drucker.
- Tippe auf „Gerät hinzufügen“.
- Wähle den Typ: „Küchendrucker“ oder „Bondrucker (eingebaut)“.
- Enter the name and choose the brand: Epson (ESC/POS), Star (StarPRNT), Bixolon (ESC/POS), Sunmi (built-in), or Other (ESC/POS). The brand determines the print protocol. The model is optional.
- Wähle den Verbindungstyp: Netzwerk (TCP/IP), Sunmi (eingebaut) oder Seriell (COM).
- For network, enter the IP address or hostname and the port. For serial, the baud rate goes in the Port field.
- Stelle die Druckanzahl ein: Wie viele Exemplare pro Bestellung gedruckt werden.
- Tap “Save”.
Network printers need a fixed IP address in the same network as the POS. It's best to assign them a fixed address in your router.
Production station for kitchen printer
For a kitchen printer, you select the production station: the categories this printer prints.
- No selection means: default kitchen printer. It prints everything that no other production station handles.
- Example bar: check only the drinks categories.
The printer list shows each printer's type, production station, make, connection, IP and port, plus the number of copies.
Test print
In the printer's row, tap the print icon (“Test print”) to start a test print. The POS app also has a “Test print” button in the back office under “Devices”. If nothing prints, see “Printer not printing”.
Receipt assignment per POS
Once printers are created, “Receipt assignment per POS” appears. There you set for each POS which receipt goes to which printer:
- POS receipt (invoice)
- Provisional bill
- Invoice copy & hospitality receipt (Bewirtungsbeleg)
- Void receipt
- Kitchen ticket (including void & course firing)
- Reports (X report)
- Cash drawer (opening pulse)
“Automatic” picks the first matching printer. Only network printers are available. The POS applies changes within 2 minutes.
Druckaufträge prüfen und nachdrucken
The POS app keeps a log of the device's print jobs. Open More → Back office and go to "Print jobs".
- Ein grüner Punkt bedeutet gedruckt, ein roter Punkt „nicht erreichbar“ mit der Nummer des Versuchs. Oben rechts steht „x offen“. Gezeigt werden die letzten 12 Aufträge.
- Reprint individually: On the red entry, tap the retry icon.
- Reprint all: Tap "Resend failed".
- The POS automatically retries failed jobs every 60 seconds. Failed jobs from the last 24 hours are kept even after the app restarts.
Gestaltung der Belege
Schriftgröße, Logo, Leerzeilen oben und breitere Zeilen stellst du je Belegart unter Einstellungen → Design & Branding im Bereich „Beleg-Gestaltung“ ein. Das Logo erscheint, wenn du eines hinterlegt hast.
Without a printer
Without a printer, receipts are provided via QR code or email.