
Cards, Apple Pay and Google Pay run through your business's own Stripe account. The revenue goes straight to your bank account. The online shop, QR at the table, deposits and vouchers use the same connection.
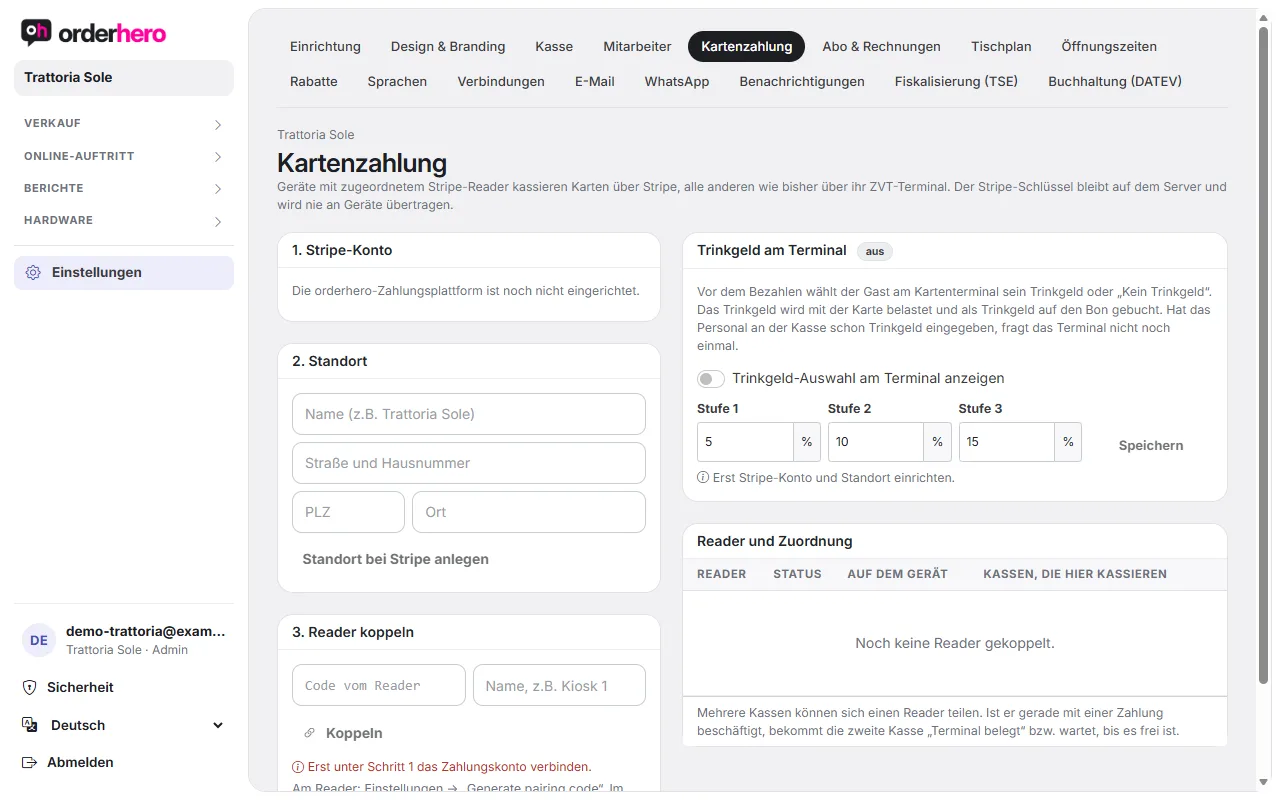
You set everything up under Settings → Card payment. Devices with an assigned Stripe reader take card payments via Stripe, all others via their ZVT terminal.
Step 1: Stripe account
- Tap “Connect with Stripe”. A business email address is optional.
- Stripe guides you through verification (company, management, bank details). It only has to be done once.
- If it isn't complete, it says “Verification pending” and shows the “Continue verification” button. It's done when you see “Payments enabled” and “Payouts active”.
Ein Badge zeigt, ob du im „Testmodus“ oder „Live“ bist.
Schritt 2: Standort
Enter name, street, postal code and city, then tap "Create location at Stripe". If you've already saved the business address under Design & Branding, the location is created automatically when you pair the first reader.
Step 3: Pair the reader
- On the reader, open Settings → “Generate pairing code”.
- Enter the code under "Pair reader", optionally give it a name and tap "Pair".
- In test mode, a simulated reader works with the code
simulated-wpe.
You can rent the Stripe Reader S710 card reader from orderhero for €15 per month.
Readers and assignment
The "Readers and assignment" table shows the status (online or offline) for each reader.
- The orderhero app runs on the S700/S710. Choose "orderhero POS" (full POS on the device, counts as a POS) or "Payment terminal only" (payments from other POS devices, doesn't count as a POS). With "Pair" you generate the pairing code for the app on the reader.
- With "Payment terminal only", tick the POS devices that take payments here.
- Mehrere Kassen können sich einen Reader teilen. Ist er mit einer Zahlung beschäftigt, bekommt die zweite Kasse „Terminal belegt“ bzw. wartet.
- In test mode, there's "Test" for a €1 test payment.
You'll see the same under Hardware → Payment terminals.
Tip on terminal
Mit „Trinkgeld-Auswahl am Terminal anzeigen“ wählt der Gast vor dem Bezahlen sein Trinkgeld oder „Kein Trinkgeld“. Die Stufen in Prozent legst du darunter fest. Das Trinkgeld wird mit der Karte belastet und als Trinkgeld auf den Bon gebucht. Hat das Personal schon Trinkgeld eingegeben, fragt das Terminal nicht noch einmal.
View and refund payments
Under Reports → Payments you'll see all card payments from POS, kiosk, online shop, QR payment, vouchers and reservations. Use "Refund" to refund a payment in full or in part. If a receipt is voided, the money automatically goes back to the card.
Own terminal (ZVT)
If you already have a terminal with a ZVT interface, add it under Hardware → Payment terminals:
- Tap “Add ZVT terminal”.
- Enter the name, IP address and port as well as the ZVT password, then save.
- With "Request cash report now" you trigger the cash report on the terminal. The status is shown next to it (pending, done, failed).
Important
- Card payments only work with an internet connection.
- Im Testbetrieb (Testphase) werden Kartenzahlungen nur simuliert.
- If a payment fails, see “Card payment fails”.